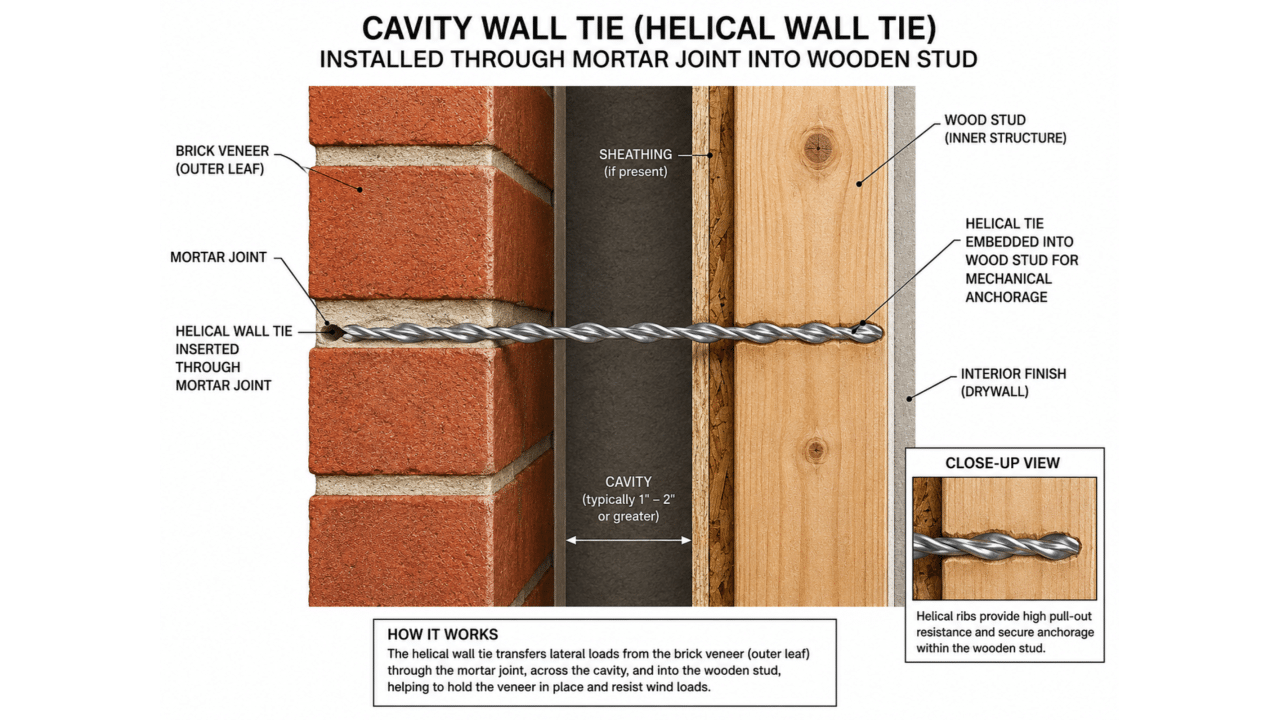

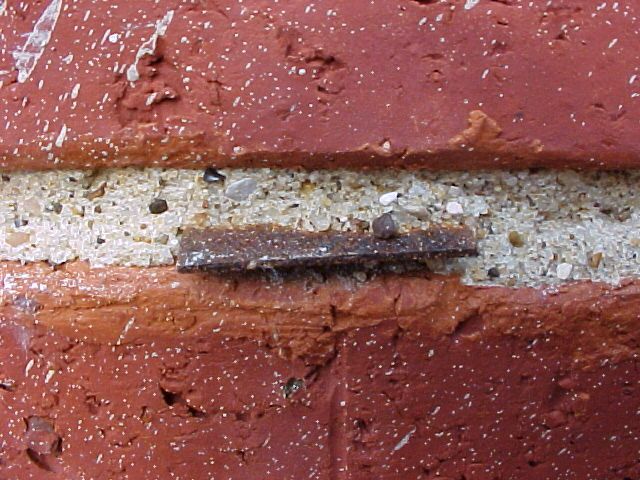
For decades, masonry veneer walls across America have been marketed as durable, maintenance-free systems. But many buildings constructed from the 1960s onward are now reaching an age where concealed defects are beginning to emerge. Corroded wall ties, excessive cavity widths, poor workmanship, and moisture intrusion are becoming increasingly common findings during forensic investigations.
As a result, remedial helical wall tie systems have become one of the primary repair methods used to stabilize masonry veneer walls attached to wooden or steel framing systems.
On paper, the process looks straightforward:
- Drill through the mortar joint
- Penetrate the cavity
- Embed into the wooden stud
- Stabilize the veneer
In reality, it is far more complicated.
Improper installation can create structural problems, interior damage, electrical hazards, water penetration risks, and costly liability issues for contractors, engineers, architects, and property owners.
The industry often treats remedial wall tie installation as a simple “drill-and-fix” operation. It is not.
Installing helical remedial wall ties into wooden studs requires an understanding of:
- Masonry behavior
- Cavity wall construction
- Structural movement
- Wood framing tolerances
- Hidden services inside walls
- Moisture management
- Load transfer
- Drill resistance interpretation
- Historical construction methods
This is why remedial wall tie installation should never be considered an entry-level repair.
1. The Hidden Problem: Variable Cavity Widths
One of the biggest misconceptions in masonry veneer construction is the assumption that cavity widths are uniform.
They are not.
In theory, in America, many veneer systems were designed with approximately a 1-inch cavity. In reality, field investigations frequently reveal:
- 2-inch cavities
- 3-inch cavities
- Irregular cavity dimensions
- Cavities partially blocked with mortar droppings
- Bowed sheathing
- Misaligned framing
- Debris accumulation
The installer often has no visual confirmation of what exists inside the wall before drilling.
This creates several risks.
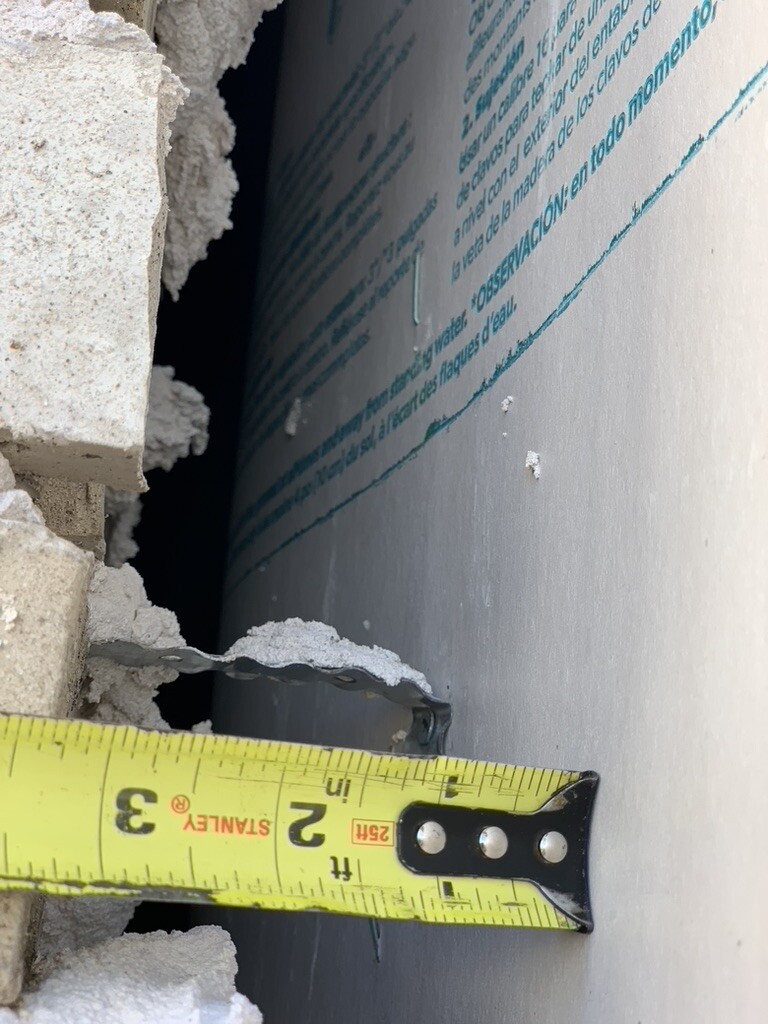
This exceeds the one inch cavity and the tie is installed upside down
Incorrect Tie Embedment
If the cavity is wider than expected, the installer may assume the tie has embedded properly into the stud when it has not.
The tie may only partially penetrate the stud or miss it entirely.
The result:
- Reduced pull-out resistance
- Reduced compression capacity
- Loss of lateral restraint
- Future veneer movement
In some cases, the tie may only bite into sheathing material instead of the structural stud itself.
That is not structural stabilization.
That is false confidence.
2. Over-Driving the Tie Into the Stud
Another major problem occurs when ties are driven too deeply into the wall.
This issue becomes more severe when installers lack experience interpreting installation resistance.
A remedial wall tie should achieve adequate embedment into the stud without excessively penetrating beyond the required depth.
However, inexperienced installers may continue driving the tie aggressively after resistance changes.
This creates several dangers.
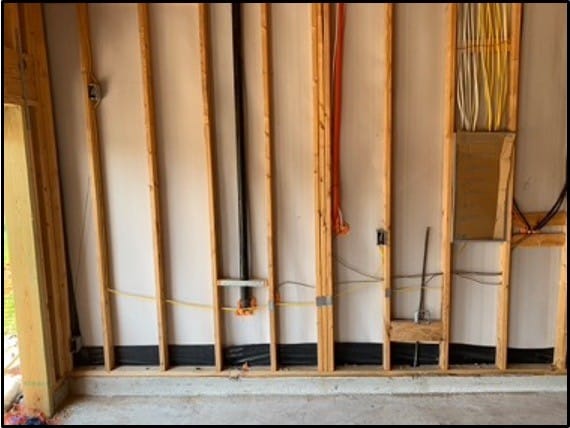
Electrical Wiring Damage
Modern wood stud walls often contain:
- Electrical cables
- Junction boxes
- Data cables
- Security wiring
- HVAC controls
A tie driven too deeply can penetrate electrical wiring concealed within the stud cavity.
Potential consequences include:
- Electrical shorts
- Fire hazards
- System failures
- Injury risk to installers
- Liability exposure
An installer may never realize the damage occurred until systems fail later.

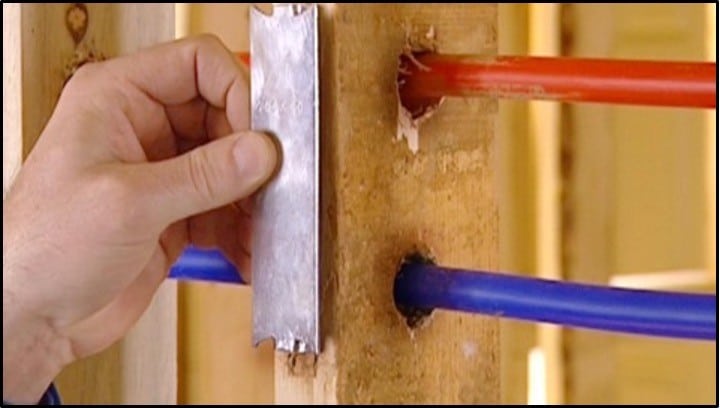
Water Pipe Damage
Water supply lines are another concealed hazard.
A helical tie penetrating copper, PEX, or plastic piping can cause:
- Hidden leaks
- Moisture saturation
- Mold growth
- Rotting sheathing
- Insurance claims
- Interior finish damage
The repair cost can easily exceed the original stabilization project itself.

3. Knot Resistance Inside the Stud
Wood is not a uniform material.
Every experienced carpenter understands this.
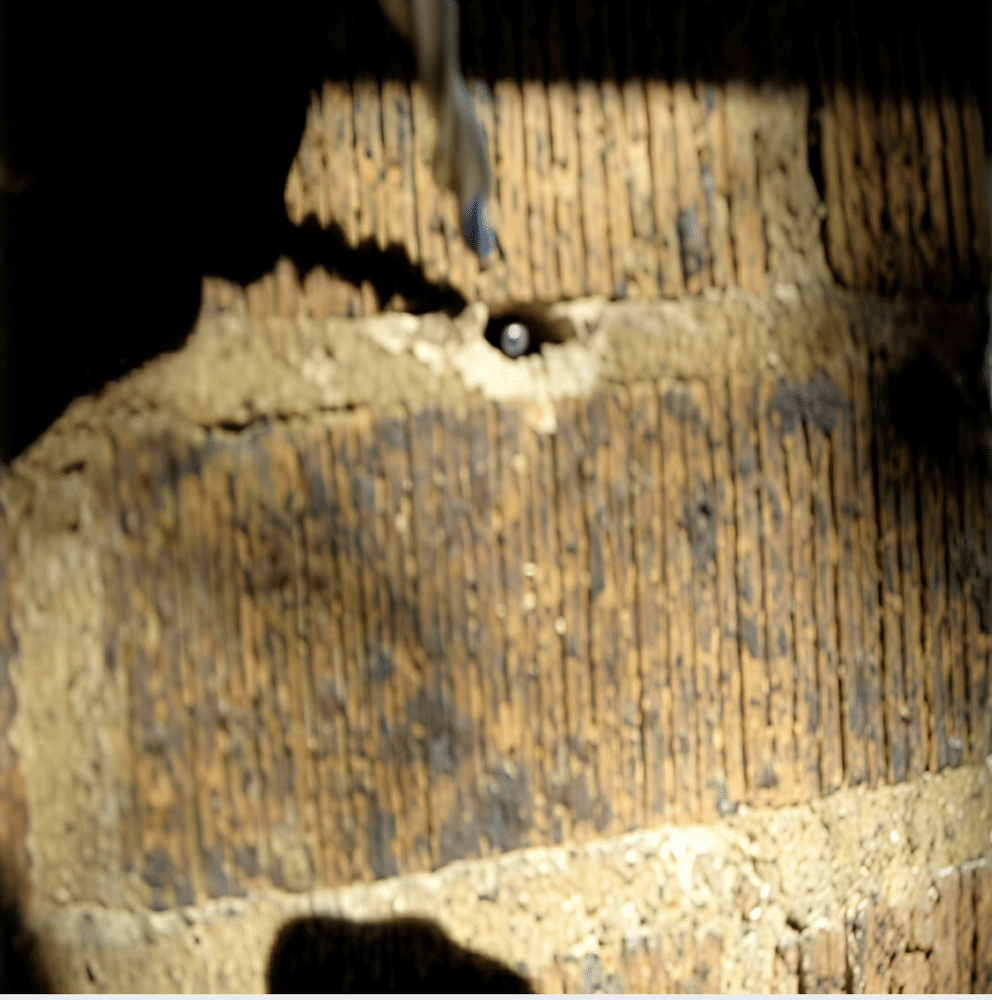
Knots inside timber framing dramatically affect drilling resistance and tie embedment.
When a helical remedial tie encounters a dense knot, several things can happen:
- The tie stops advancing properly
- The installer increases torque
- The tie deviates directionally
- The pilot hole enlarges
- The masonry connection weakens
This is a critical issue rarely discussed in manufacturer literature.

Loss of External Anchorage
If excessive resistance occurs during installation, the tie can begin enlarging the pilot hole within the mortar joint or masonry veneer itself.
Instead of forming a tight mechanical bond, the tie may begin “spinning” within the outer leaf.
At that point:
- The outer masonry connection becomes compromised
- The tie may appear installed correctly
- The stabilization capacity becomes questionable
The wall may still move even though the repair visually appears complete.
This creates a dangerous false sense of security for owners and consultants.
4. Stud Splitting Near Edges
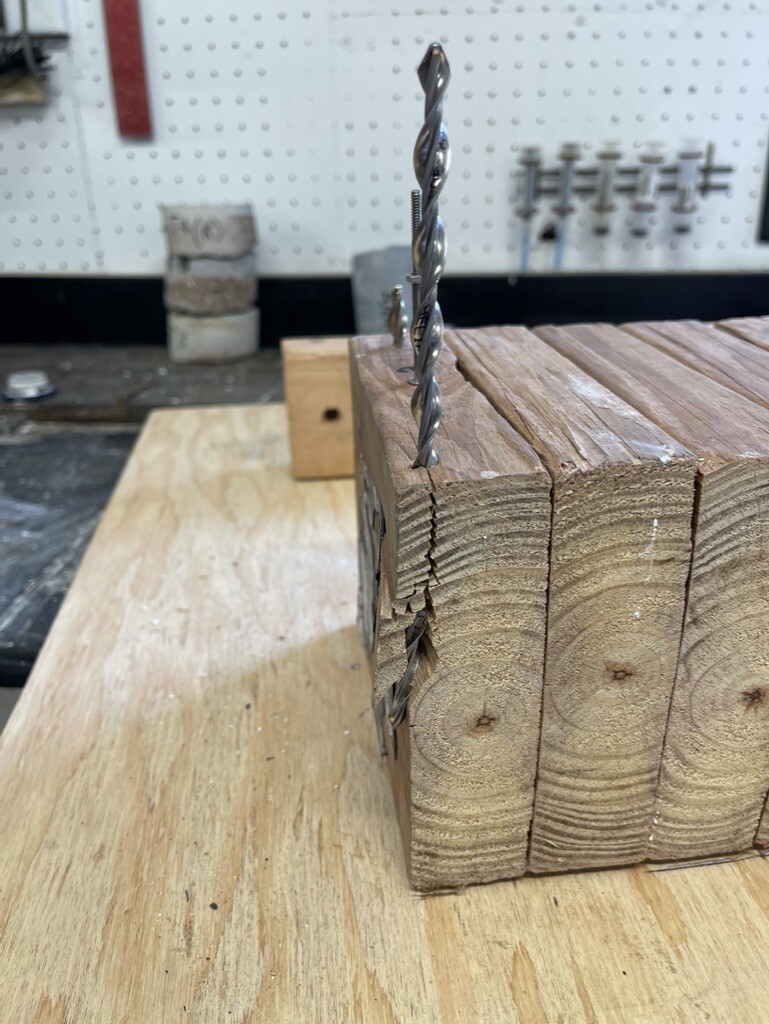
Another overlooked problem occurs when ties are installed too close to the edge of a timber stud.
Wood framing members already contain:
- Shrinkage stresses
- Existing fasteners
- Service penetrations
- Natural imperfections
Driving a helical tie near the edge can split the stud longitudinally.
Consequences include:
- Reduced stud capacity
- Loss of tie anchorage
- Additional wall movement
- Structural weakening
On older buildings with dry or brittle timber framing, the risk becomes even greater.
The installer may never know the stud split occurred because it happens inside the concealed wall assembly.
Again, the wall may appear repaired while hidden damage continues behind the veneer.

5. Interior Nail Pops and Drywall Damage
One issue that receives very little attention is vibration transfer during installation.
Helical wall ties are often installed using hammer-drill or SDS-driven equipment.
These tools generate repeated percussion forces that transfer through the stud framing system.
In occupied residential or commercial buildings, this vibration can cause:
- Nail pops
- Drywall cracking
- Joint tape separation
- Plaster damage
- Cosmetic cracking around openings
The owner may suddenly notice interior defects appearing during or after installation.
These repairs can become expensive and contentious.
The contractor may argue the defects were pre-existing.
The owner may insist the installation caused the damage.
Without proper pre-documentation and communication, disputes quickly follow.
6. Electrical Boxes and Service Penetrations
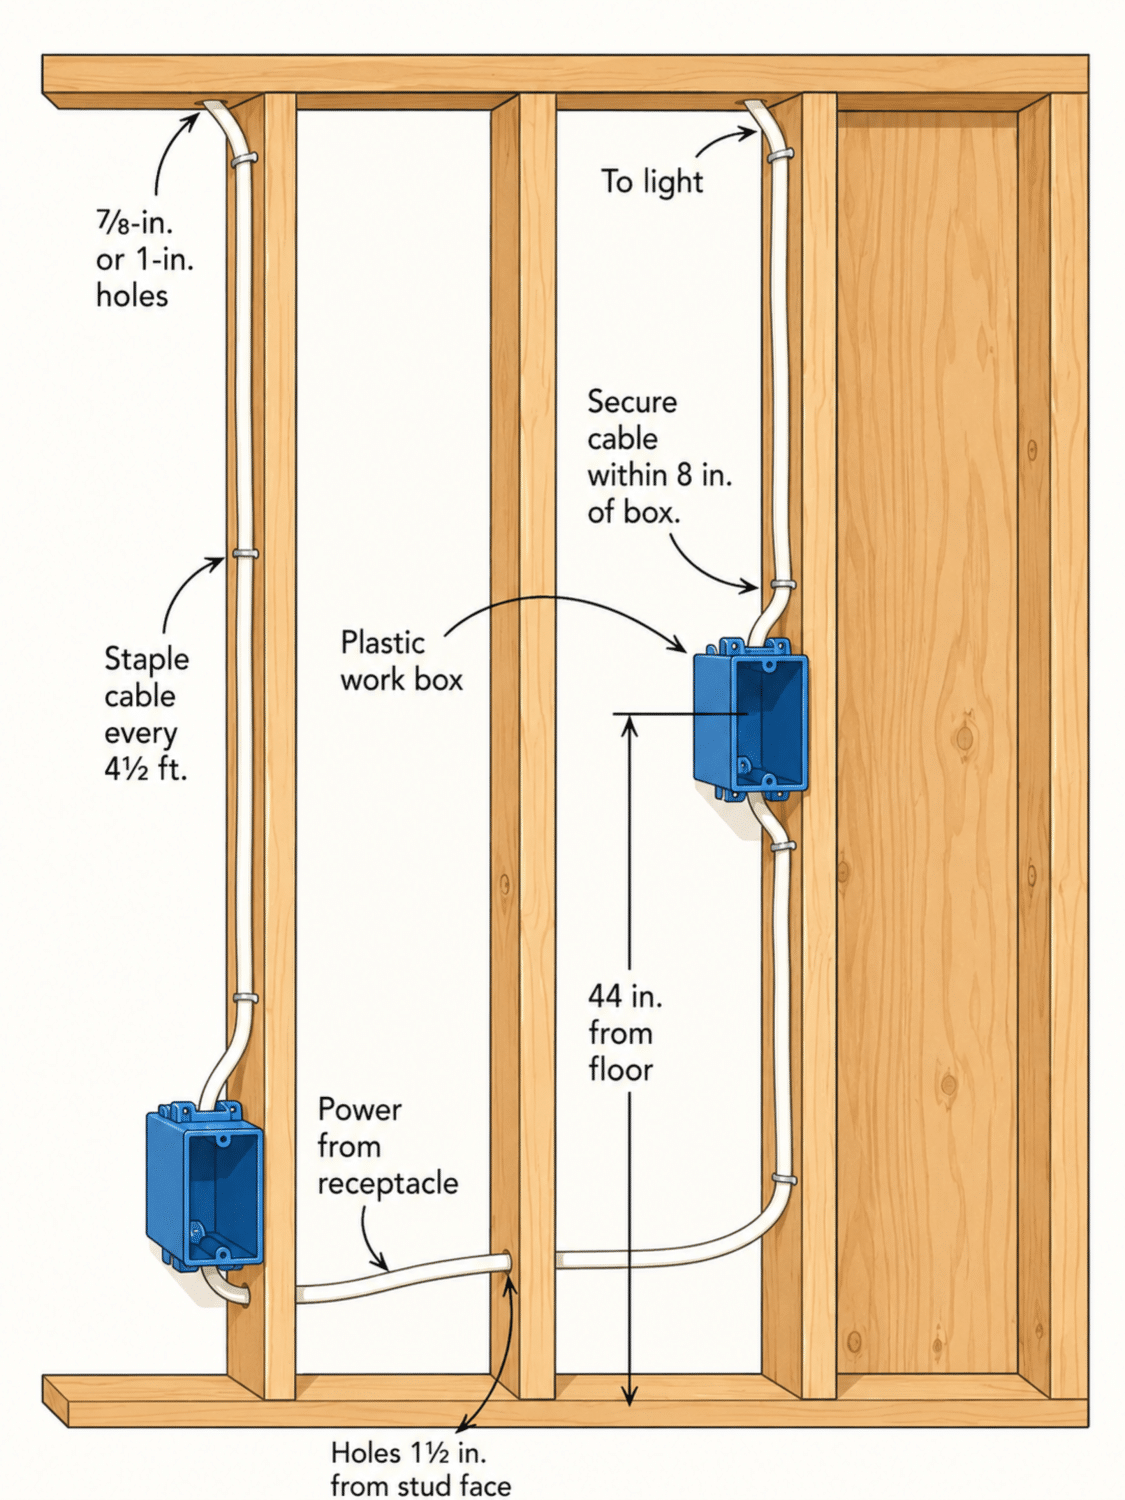
Electrical boxes positioned near mortar joints create another hidden hazard.
The installer often has no visibility behind the masonry veneer.
A tie can accidentally penetrate:
- Outlet boxes
- Switch boxes
- Conduit systems
- Low-voltage systems
This can create:
- Electrical hazards
- Failed inspections
- Fire code issues
- Expensive wall demolition
Many installers underestimate how congested modern stud walls actually are.

7. Moisture Risks After Installation
Improper installation can also introduce water penetration risks.
Common problems include:
- Oversized drill holes
- Poor mortar patching
- Cracked mortar joints
- Improper sealant compatibility
- Damage to weather barriers
If the outer mortar joint is not restored correctly, water can penetrate around the tie location.
Over time, this can lead to:
- Wet insulation
- Mold growth
- Timber deterioration
- Sheathing decay
- Corrosion of hidden components
Ironically, a repair intended to stabilize the wall can accidentally accelerate deterioration.
8. Why Installation Resistance Matters
Experienced installers learn to “read” the drill during installation.
The sound, vibration, and resistance profile often reveal:
- Cavity width changes
- Debris inside cavities
- Missed studs
- Knot resistance
- Split timber
- Metal obstructions
This is field knowledge developed through experience.
A novice installer may not recognize these warning signs.
Instead, they simply continue drilling until the tie “feels tight.”
That is not engineering.
That is gambling with concealed construction.

9. Should Manufacturers Offer More Training?
The answer is absolutely yes.
Many manufacturers provide installation sheets and short demonstrations.
That is not enough.
If the industry expects these systems to stabilize occupied buildings safely, then manufacturers should consider:
Requiring something like Helifix approved installer program, of which I am the only person in America to have taken.
Mandatory Installer Certification
Installers should demonstrate competency in:
- Wall assembly identification
- Cavity assessment
- Stud locating methods
- Moisture evaluation
- Electrical hazard awareness
- Tie spacing calculations
- Torque interpretation
- Proper embedment verification
Hands-On Field Training
Real walls behave differently from laboratory mockups.
Training should include:
- Historic buildings
- Modern veneer systems
- Irregular cavities
- Failed installations
- Live troubleshooting
Forensic Failure Education
Installers should study actual failures, including:
- Corroded wall ties
- Missed studs
- Split framing
- Over-driven anchors
- Moisture-related deterioration
Without understanding failures, installers repeat them.

10. This Is Not a Novice Repair
The construction industry often underestimates masonry veneer stabilization.
A remedial wall tie is not simply a fastener.
It becomes part of the structural behavior of the wall assembly.
Poor installation can create:
- Structural instability
- Water intrusion
- Electrical hazards
- Hidden damage
- Expensive litigation
For engineers, architects, and contractors, the real danger is this:
A wall can appear repaired while concealed defects remain unresolved.
That is why investigation must always come before installation.
Before any remedial tie project begins, professionals should consider:
- Is the cavity width known?
- Are the studs accurately located?
- Are hidden services mapped?
- Is the timber condition verified?
- Is moisture intrusion already present?
- Is the installer properly trained?
Because once the drilling starts, mistakes become concealed inside the wall system itself.
And concealed mistakes are often the most expensive ones to discover later.
Final Thoughts
The masonry restoration industry is entering a period where millions of square feet of aging veneer construction will require stabilization.
Remedial helical wall ties are an important part of that future.
But the industry must stop pretending these systems are foolproof.
They require:
- Investigation
- Training
- Experience
- Diagnostic understanding
- Quality control
Otherwise, the repair itself risks becoming the next hidden defect inside the wall.
For engineers, architects, and contractors, the lesson is simple:
If you cannot see what is happening inside the wall, you should never assume the installation is correct.
Because masonry failures rarely begin with what you can see on the outside.